|
Confirmation of Privacy PolicyPlease note that some functions of this website require you to agree to the terms and conditions that are outlined in our privacy policy. Until then, this message will be displayed from time to time. With your consent, you also agree to the use of cookies. Additionally, by using this website, you accept that non-personalized log and tracking information from accessing our website can be saved and processed according to our privacy policy. |
|||
|
Knowledge Base / FAQ
ID: KB00303EN | short link:
Introduction to DirectWIRE Virtual Channels
Some of our 2 channel audio devices like U22 XT and UGM192 for instance provide a feature that we call DirectWIRE Virtual Channels. This function is available on Windows and it is recommended to update to the latest version of the driver for your audio interface to be able to use it.
A virtual channel is a 2 channel wave device that can be used for playback of any audio data, while simultaneously that exact same signal can be recorded in (usually) a different audio application. The difference to a physical channel is that no signal is being recorded from the physical inputs of the audio interface and by default no signal is being sent to the physical output of the hardware as well - instead it is simply a fully digital connection of audio data inside your computer.
You will find in the Windows Sound control panel (you can open it via File > Windows Audio Settings in the control panel of your ESI audio interface) and in the audio input / output related settings of many applications that there are the virtual channels listed both for Playback and Recording:
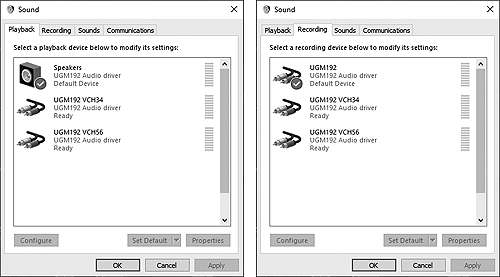
Beside the regular playback and recording device for the physical input and output, the virtual channels are also selectable (i.e. one device for channel 3 / 4 and one for 5 / 6).
It gets interesting when you are also changing the routing of the virtual channel signals via the regular DirectWIRE dialog that can be opened in the control panel of your ESI audio interface:
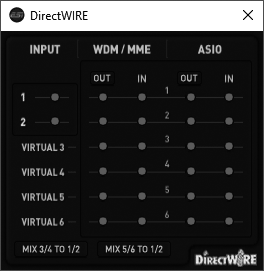
This dialog allows you to virtually connect playback (output) channels and input channels with virtual cables on the screen, for both the physical and the virtual channels.
The three main columns are labeled INPUT (the physical hardware input channel), WDM/MME (the playback/output and input signals from audio software that use the Microsoft MME and WDM driver standard) and ASIO (the playback/output and input signals from audio software that uses the ASIO driver standard).
The rows from top to down represent the available channels, first the two physical channels 1 and 2 and under it the two pairs of VIRTUAL channels numbered 3 to 6.
The two buttons MIX 3/4 TO 1/2 and MIX 5/6 TO 1/2 at the bottom allow you to mix the audio signal that is played via virtual channels 3/4 (or virtual channels 5/6) to the physical output 1/2, if required (which means that even though the channels are virtual, the playback signal will be sent to the physical output of the audio interface).
Finally, the MME/WDM and ASIO playback can be muted (= not sent to the physical output) by clicking on OUT if required.
For further explanation, let's look at the following example configuration to illustrate some of the powerful options:
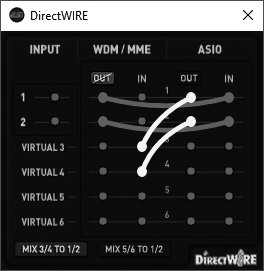
You can see here connections between ASIO OUT 1 and ASIO OUT 2 to WDM/MME VIRTUAL IN 3 and WDM/MME VIRTUAL IN 4. This means that any playback of an ASIO application via channel 1 and 2 (for instance your DAW) will be sent to the WDM/MME wave device 3/4, allowing you to record or maybe live stream the output of the ASIO software with an application that records on channel 3/4.
You can also see that the playback of channel 1 and 2 (WDM/MME OUT 1 and WDM/MME OUT 2) is connected with the ASIO input of channel 1 and 2 (ASIO IN 1 and ASIO IN 2). This means that anything any MME/WDM compatible software plays on the physical channels 1 and 2 can be recorded / processed as input signal in your ASIO application. Also, this signal cannot be heard via the physical output of your audio interface, since the OUT button is set to mute.
Finally, the enabled MIX 3/4 TO 1/2 button means that everything played via virtual channel 3/4 can be heard on the physical outputs.
We understand that this might be a bit complex initially, however please keep in mind that every use of DirectWIRE is specific and there is hardly any universal setup guide for certain complex requirements.
For a very practical example, we recommend to check our How to add music to a Skype call with DirectWIRE? tutorial, which is available as a video as well.
Related productsMore support pages |
Tags
Download
|