|
Confirmation of Privacy PolicyPlease note that some functions of this website require you to agree to the terms and conditions that are outlined in our privacy policy. Until then, this message will be displayed from time to time. With your consent, you also agree to the use of cookies. Additionally, by using this website, you accept that non-personalized log and tracking information from accessing our website can be saved and processed according to our privacy policy. |
|||
|
Knowledge Base / FAQ
ID: KB00149EN | short link:
aktiv 10s connectors & functions
This text describes the layout and main functions of the rear panel of our aktiv 10s active monitors.
Rear Panel
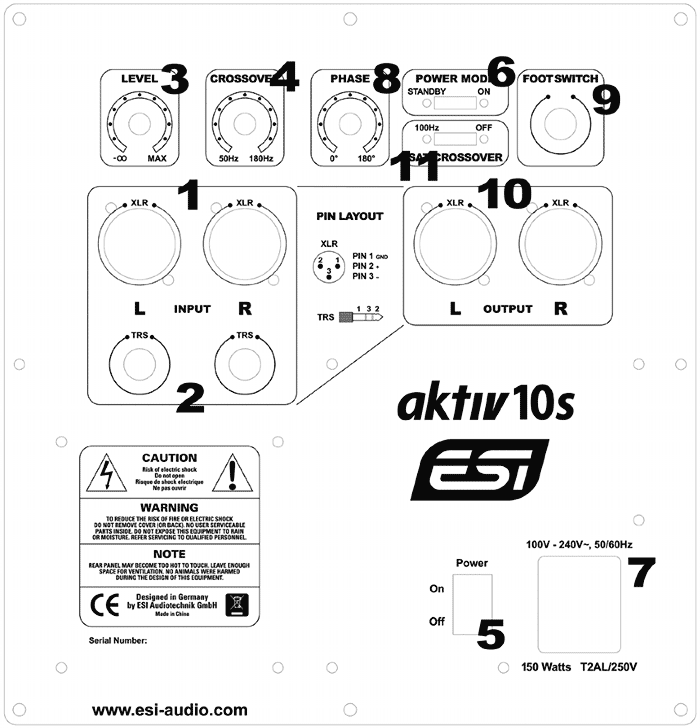
1. XLR inputs - these connectors accept balanced XLR input connections. The XLR input is wired like this:
| INPUT SIGNAL | XLR CONNECTIONS |
| + | PIN 2 |
| - | PIN 3 |
| Shield | PIN 1 |
2. TRS inputs - these jacks accept TRS input connections, either balanced or unbalanced. For balanced connections, a 3-conductor TRS plug is necessary. The TRS input is wired like this:
| INPUT SIGNAL | TRS CONNECTIONS |
| Signal | Tip |
| Shield | Sleeve |
Unbalanced wiring works with either a 2- or 3-conductor TRS connector. A 2-conductor TRS plug (or sometimes also just called TS plug) automatically grounds the minus signal input, whereas a 3- conductor TRS plug wired unbalanced provides the option of leaving the minus open or grounded. We recommend that you ground the unused input.
3. level control knob - use this level control knob to adjust to the input proper input level from the sound source.
4. subwoofer crossover control - this controls a low-pass filter with upper limit between 50Hz and 180Hz. You can adjust the crossover frequency for the actual aktiv 10s subwoofer output here. If you are not using any satellites connected to the subwoofer directly it is best to set this to 180Hz. Don?t confuse this with the satellite crossover control (11).
5. power switch - when you push the power switch, aktiv 10s will be turned on, and ?surprise? it will be turned off when you push the power switch again.
6. power mode stand by switch - this switch controls weather aktiv 10s is always on or works in a standby mode, which means that it goes into a low power mode when no audio signal is played.
7. power port with ext. fuse - use this connector to plug in the detachable 3-circuit line cord that connects to the power outlet. The connector has a T2AL/250V fuse inside.
8. phase control - the purpose of this control is to match the phase of the satellite cut off frequency to the phase of the upper frequency limit of the subwoofer. Adjust the phase control for maximum sound pressure at cross over frequency in order to make sure that the subwoofer and satellites are in phase at cross over frequency. This allows you to get the maximum sound pressure and most accurate sound quality after setup.
9. foot switch connector - this connector allows you to connect a foot switch that you can use to mute the subwoofer sound. This is helpful if you want to make A/B comparison of the sound with and without subwoofer and you can quickly control it with a simple pedal.
10. XLR outputs - these connectors provide a balanced XLR signal for left and right channel. If you are not using an amplifier with its own bass management, you will need to connect your satellite speakers to these outputs accordingly using balanced XLR cables.
11. satellite crossover control - this allows you to adjust the crossover frequency for the output to the satellites connected to aktiv 10s via the XLR outputs (10). You can either disable the crossover frequency or you can set it to 100Hz. Don't confuse this with the subwoofer crossover control (4).
Related products
More support pages |
Tags
Download
|