|
Confirmation of Privacy PolicyPlease note that some functions of this website require you to agree to the terms and conditions that are outlined in our privacy policy. Until then, this message will be displayed from time to time. With your consent, you also agree to the use of cookies. Additionally, by using this website, you accept that non-personalized log and tracking information from accessing our website can be saved and processed according to our privacy policy. |
|||
|
Knowledge Base / FAQ
ID: KB00053EN | short link:
Installation of RoMI/O under Windows
Introduction
This article covers the installation of RoMI/O under Windows XP, Windows Vista and Windows 7/8. The following text first explains the installation under Windows Vista and Windows 7/8, followed by the installation under Windows XP, each in a different section. Please only check the corresponding section for your operating system. Please note that the RoMI/O driver is not intended for the newer RoMI/O II.
Installation under Windows Vista and Windows 7/8
Disconnect RoMI/O before you install the driver if it has been connected already. Then launch setup.exe from the unzipped downloaded driver. When launching the installation, Windows Vista or Windows 7/8 might prompt a security message. Make sure to allow the installation. You will then see a dialog as shown on the left picture below. Click Next. You can define the target directory for the installation now. Confirm it with Next.

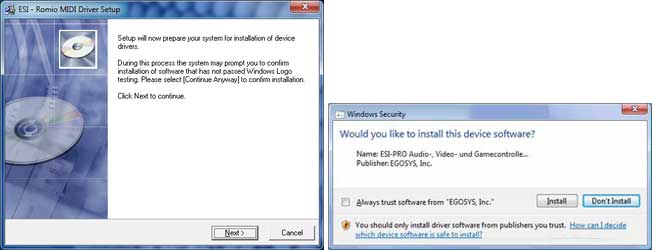
The installer now informs you that the driver installation will start as shown on the left picture below. Confirm this with Next. During the following process you will see a Windows Security dialog box once or several times that asks you for confirmation to install the driver software. Confirm any such dialog with Install.
You will now be prompted to connect the hardware on the next dialog that is shown below. Plug in RoMI/O. Do not click OK yet. Instead, wait a few seconds for the automatic device driver installation. You can monitor this in the task notification area where Windows informs that the driver is installed via a bubble message box.

After all the mentioned steps are completed, the installation is finished and completed successfully. You can start using RoMI/O in your applications now.
Installation under Windows XP
Disconnect RoMI/O before you install the driver if it has been connected already. Then launch setup.exe from the unzipped downloaded driver. You will now see a dialog as shown on the left picture below. Click Next. You can define the target directory for the installation now. Confirm it with Next.

The installer now informs you that the driver installation will start as shown on the left picture below. Confirm this with Next. During the following process you will see a dialog box once or several times that informs you that the driver software has not passed Windows Logo testing. Please be assured that our drivers have been tested in various different ways and are OK to be used. Confirm any such dialog with Continue Anyway.

You will now be prompted to connect the hardware on the next dialog that is shown below on the left. Plug in RoMI/O. Do not click OK yet. During the driver installation, Windows might again prompt you to confirm the Windows Logo testing dialog once or several times with Continue Anway before the driver installation is finalized.

After all the mentioned steps are completed, the installation is finished and completed successfully. You can start using RoMI/O in your applications now.
Related productsMore support pages |
Tags
Download
|