|
Confirmation of Privacy PolicyPlease note that some functions of this website require you to agree to the terms and conditions that are outlined in our privacy policy. Until then, this message will be displayed from time to time. With your consent, you also agree to the use of cookies. Additionally, by using this website, you accept that non-personalized log and tracking information from accessing our website can be saved and processed according to our privacy policy. |
|||
|
Knowledge Base / FAQ
ID: KB00006EN | short link:
nEar05 eXperience connectors & functions
This text describes the layout and main functions of the rear panel of our nEar05 eXperience active monitors.
Rear Panel
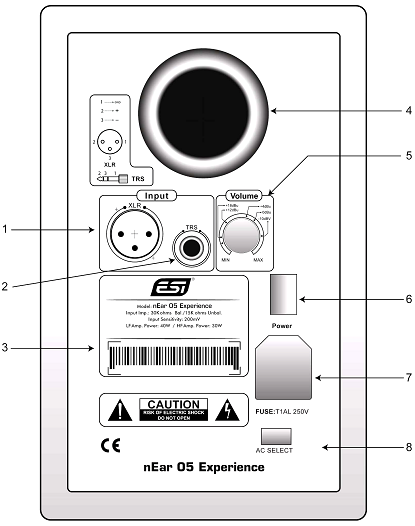
1. XLR input - this connector accepts balanced XLR input connections. The signal of the XLR input is mixed together with the TRS input signal through a balanced input amplifier. The XLR input is wired like this:
| INPUT SIGNAL | XLR CONNECTIONS |
| + | PIN 2 |
| - | PIN 3 |
| Shield | PIN 1 |
2. TRS input - this jack accepts TRS input connections, either balanced or unbalanced. For balanced connections, a 3-conductor TRS plug is necessary. The TRS input is wired like this:
| INPUT SIGNAL | TRS CONNECTIONS |
| + | Tip |
| - | Ring |
| Shield | Sleeve |
Unbalanced wiring works with either a 2- or 3-conductor TRS connector. A 2-conductor TRS plug (or sometimes also just called TS plug) automatically grounds the minus signal input, whereas a 3-conductor TRS plug wired unbalanced provides the option of leaving the minus open or grounded. We recommend that you ground the unused part.
3. bar code label - this label contains the product serial number bar code.
4. vent port - nEar05 eXperience is a vented box speaker system with a vent port on the rear panel. Make sure you are not blocking the vent port (i.e. by putting the speaker too close to a wall) or the sound colour will be changed.
5. volume control knob - use the volume control knob to set the proper input level from the sound source. Make sure to setup the left / right speakers accordingly. Please refer to the image on the right to see the input level to match your sound source. You might also want to refer to the manual of the sound source connecting to the input of nEar05 eXperience. Generally-10dBV or +4dBu are the most common output levels of semi-professional and professional audio equipment. For example, if your sound source outputs with a -10dBV reference level, you should not set the volume control knob to more than -10dBV for maximum power.
6. power switch - when you push the power switch, nEar05 eXperience will be turned on, and -surprise- it will be turned off when you push the power switch again.
7. power port with ext. fuse - use this connector to plug in the detachable 3-circuit line cord that connects to the power outlet.
8. AC selection - you can select either 110V or 230V AC power according to your local requirements. Make sure this is selected properly before you switch on nEar05 eXperience for the first time or your equipment could be damaged.
Related products
More support pages |
Tags
Download
|